Migrate Citrix Policies from XenApp 6.5 to >7.6
Simple process for policy migration from xenapp 6.5 to Citrix 7.xx
Migrate Citrix Policies from XenApp 6.5 to >7.6
In this post I will outline the process I used to overcome the limitations of existing Citrix policy migrating tools. Per Citrix, there is no direct path to migrate policies from xenapp version 6.5 to 7.7 or above, you must first install and migrate to 7.6, then do an in-place upgrade to the desired version. (source: docs.citrix.com). Unfortunately, many discover this only after their brand new 7.7 or higher farm is stood up. If you are in a similar situation or if you would like to try a more streamlined approach, the procedure below will help you save some time. It is quick and relatively painless, however, you will need to use and modify PowerShell modules. If you are uncomfortable with PowerShell this is a great learning opportunity. The process is broken down into 4 parts below.
Export
- Download the Citrix Migration Tool from the xenapp 7.6 download page: Citrix 7.6 Downloads
- Important note, be sure to download the migration “scripts”, not the migration “tool”. The files we need are
ReadIMA.zipandImportFMA.zip. If you seeXDExport.zipandXDImport.zip, you have the the actual tool and it will not work.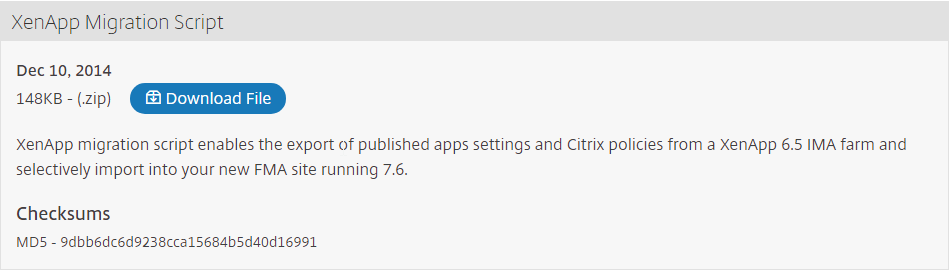
- Important note, be sure to download the migration “scripts”, not the migration “tool”. The files we need are
- On a 6.5 farm server ensure you have Windows Management Framework 3 or above installed, I used WMF 4. You can download here: Microsoft WMF 4.0
- Extract
ReadIMA.ziptoC:\temp Open and administrator command prompt and execute the following:
Note if you get security warnings press “R” to ignore and load scripts

cd c:\temp\ReadIMA
Import-Module .\exportpolicy.psd1
Import-Module .\exportxafarm.psd1
Export-Policy -XmlOutputFile .\policies.xml -LogFile .\policy-export.log
After the policy export completes, copy the
policies.xmlfile from the 6.5 server to a 7.xx delivery controller and place inC:\temp\ImportFMAIf you have a large number of policies you will want to generate a verification file now. You can use to your compare current policies the to the new farm later on. On your 6.5 server run the below commands:
if (!(Get-PSDrive | where name -eq LocalFarmGpo)) {
asnp citrix*
Import-Module .\exportpolicy.psd1
Import-Module .\exportxafarm.psd1
}
cd LocalFarmGpo:\
$userpolicies=Get-ChildItem .\User |Select-Object name
$outfile="c:\temp\ctxpolicy-old.txt"
foreach ($p in $userpolicies) {
Get-ItemProperty -path .\User\$($p.name)  |Out-File $outfile -Append
Get-ChildItem .\User\$($p.name) -Recurse |where state -eq enabled |Out-File $outfile -Append
Get-ChildItem .\User\$($p.name) -Recurse |where enabled -eq true |Out-File $outfile -Append
}
This will create a file
C:\temp\ctxpolicy.txt(feel free to rename if desired) that contains all of policies on the farm. Save this for the verification process later.
Import
In order to complete the import we will utilize the Import-Policy command which is included in the ImportPolicy.psm1 module. However, before we run it we need to fix two issues. First, it is still using the depreciated [System.Reflection.Assembly]::LoadWithPartialName method to load the plugin. We will use the simpler and more modern Add-PSSnapin cmdlet. Second, Citrix has changed their group policy snapin name from Citrix.GroupPolicy.PowerShellProvider to Citrix.Common.GroupPolicy. Since Citrix.Common.GroupPolicy is included by default in the install, we will add a simple check to see if it is loaded, if not we will load all installed Citrix Snapins. It could be a bit more refined, but this works for our purposes.
- On the 7.xx delivery controller, ensure the Citrix Group Policy Management and Powershell snappins are installed.
- Extract
ImportFMA.ziptoC:\temp\ImportFMA Right click on the
ImportPolicy.psm1file, select edit and remove or comment out the below$p = [Reflection.Assembly]::LoadWithPartialName("Citrix.GroupPolicy.PowerShellProvider") if ($p -eq $null) { Write-Error ([string]::Format("{0}`n{1}", "Citrix Group Policy Provider Snapin is not installed", "You must have Citrix Group Policy Provider Snapin installed to use this script.")) return } Write-LogFile ('Import-Module -Assembly [Reflection.Assembly]::LoadWithPartialName("Citrix.GroupPolicy.PowerShellProvider")') 1 [void](Import-Module -Assembly ([Reflection.Assembly]::LoadWithPartialName("Citrix.GroupPolicy.PowerShellProvider")))Add the following code in its place
if (!$(Get-PSSnapin |where name -Match Citrix.Common.GroupPolicy)) {
    Write-Output "Adding Citrix snap-in"
    Add-PSSnapin Citrix*
}
Save the file and open Powershell as administrator
Execute the following commands. If you receive an error about unapproved verbs, ignore it.

	cd c:\temp\ImportFMA
	Import-Module .\ImportPolicy.psm1
	Import-Module .\ImportXAFarm.psm1
	Import-Module .\LogUtilities.psm1
	Import-Module .\XmlUtilities.psm1
Test policies import with the following command
Import-Policy -XmlInputFile .\policies.xml -LogFile .\policy-import.log -previewExamine the output for any errors. If you see warnings about valid settings these can usually be ignored as there are some differences between how 6.5 and 7.xx utilize policies for configuration.
Remove the -Preview switch to import for real this time
Import-Policy -XmlInputFile .\policies.xml -LogFile .\policy-import.logGenerate your verification file as you did before, this script will be a bit different due to the way we need to create the
LocalFarmGPOPSDrive.if (!(Get-PSDrive | where name -eq LocalFarmGpo)) { New-PSDrive LocalFarmGpo –PSProvider CitrixGroupPolicy –Root \ -Controller localhost } cd LocalFarmGpo:\ $userpolicies=Get-ChildItem .\User |Select-Object name $outfile="c:\temp\ctxpolicy-new.txt" foreach ($p in $userpolicies) { Get-ItemProperty -path .\User\$($p.name) |Out-File $outfile -Append Get-ChildItem .\User\$($p.name) -Recurse |where state -eq enabled |Out-File $outfile -Append Get-ChildItem .\User\$($p.name) -Recurse |where enabled -eq true |Out-File $outfile -Append }
Resolve Merge Discrepancies with Citrix Studio
Citrix 7.xx Studio handles policy filtering in a different manner than 6.5. Separate user and computer policies no longer exist inside the GUI. Instead policies use filters that can be applied to users and computers. After an import, studio attempts to merge user policies with computer policies of the same name and applies filters for the various users and computers. Read more on this here https://support.citrix.com/article/CTX138509.
1. Open Citrix studio and click on policies, If you added several policies, there is a good chance you will be presented with the below screen
* Note the name of the policy given in the error message. There is no priority interference with the “unfiltered” policy as indicated in the message. While this message is misleading, it does give us a valuable bit of information, the other policy mentioned is called “Random-Citrix-Policy”. Make note of this policy name.
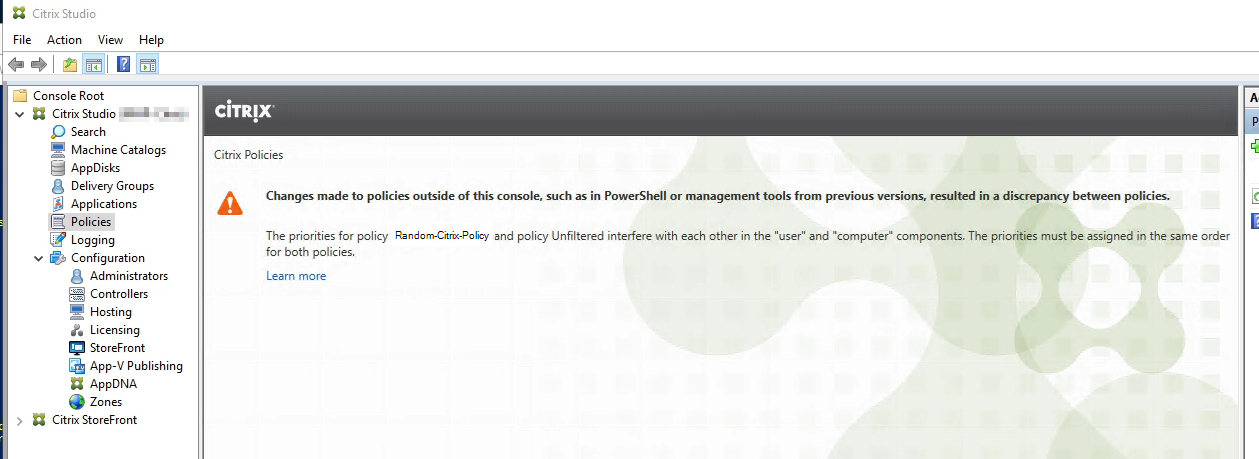 * Please note: In these examples I am censoring the actual policy name and using a made up name, ‘Random-Citrix-Policy’ for privacy.
To resolve this. Return to your admin Powershell session and execute the below commands. Use the policy names from your environment in the ‘where’ filters.
asnp Citrix*
New-PSDrive Site -PSProvider CitrixGroupPolicy -Root \ -Controller localhost
cd Site:\User
ls  | where name -eq "unfiltered”
ls  | where name -eq "Random-Citrix-Policy”
cd ..\computer
ls  | where name -eq "Random-Citrix-Policy”
ls  | where name -eq "unfiltered”
Examine the output.
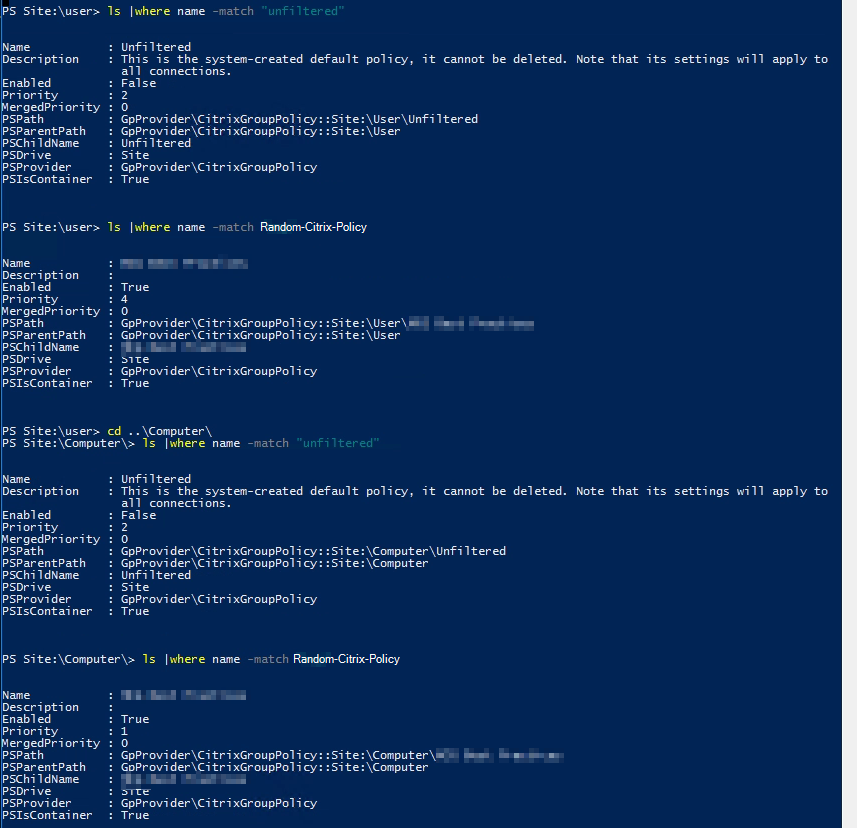
Note the priority on the same policy is different between the user and computer policies. The user policy priority is 4, and the computer is 1. We need to adjust one of these so that it matches the other. In this case I want the priority to be 4. Since ware already in the computer directory, we can change to the “Random-Citrix-Policy” policy and execute the following commands
cd ".\Random-Citrix-Policy"- If you wish to switch to the user policy run:
cd "..\user\Random-Citrix-Policy" - Then run
Set-ItemProperty . -Name Priority -value 4. Replace the ‘-value’ property with the priority value that is appropriate to your environment.
Refresh the policy view in Citrix Studio. If you see your policies you are done with this step. Otherwise you may need to repeat this process for the next policy mentioned in the error message.
Verify Policy Migration
If you followed all of the steps from the export and import process you should have 2 new files.
- On the old server:
C:\temp\ctxpolicy-old.txt - On the new server:
C:\temp\ctxpolicy-new.txt
- On the old server:
Use your favorite comparison tool. I recommend using the open source tool “WinMerge” to diff these files as the diff command in windows is less than optimal.
- Open these files in WinMerge (https://sourceforge.net/projects/winmerge/) and it will highlight any discrepancies between the old and new Citrix environments.
- It is important to note that this is not a perfect process. There will be differences due to the varying versions of powershell and Citrix snap ins. You will likely some extra lines on the new farm. These can usually be ignored but use your best judgement.
WinMerge Example:

If the policies match you are ready to move on environment build out. If some policies are incorrect, take a closer look in Citrix Studio and fix or add as necessary. In my case I had 160+ policies and did not need to recreate any.
Twitter
Google+
Facebook
Reddit
LinkedIn
StumbleUpon
Email